Portal intro: Difference between revisions
No edit summary |
link to the API page |
||
| (35 intermediate revisions by one other user not shown) | |||
| Line 1: | Line 1: | ||
=DRAFT - In Progress= | |||
= ARDC Portal 2.0 Technical Documentation = | = ARDC Portal 2.0 Technical Documentation = | ||
By Rebecca Key KO4KVG | By Rebecca Key KO4KVG | ||
Version: | Version: 4 (October 22, 2024) | ||
== Accessing the Portal == | == Accessing the Portal == | ||
| Line 9: | Line 11: | ||
Go to [https://portal.ampr.org/home https://portal.ampr.org], where you should see the following UI: | Go to [https://portal.ampr.org/home https://portal.ampr.org], where you should see the following UI: | ||
[[File: | [[File:Portal-homepage-login-v4.png|750px]] | ||
== Registration == | == Registration == | ||
# Click on the 'Register' button at the top right of the UI (see 'Accessing the Portal', step 1) or on the 'Register | # Click on the 'Register' button at the top right of the UI (see 'Accessing the Portal', step 1) or on the 'Register' button in the 'LOGIN' dialog box. This will take you to the following screen:<br>[[File:Registration-step-1-of-3-v4.png|750px]] | ||
# Complete the field for 'What should we call you?:' and click 'Continue'. | |||
# In the dialog box titled 'Registration (Step 2/3)', you will be introduced to help icons ('?') that will provide you useful information throughout the Portal. Click 'Close' to exit the dialog box.<br>[[File:Registration-step-2-of-3-popup-box-v4.png|740px]]<br>From there, you enter your Given name, Family name, email address, a username (used to login) and a password, then click 'Continue'.<br>[[File:Registration-step-2-of-3-v4.png|750px]] | |||
# You should then arrive at a dialog box titled 'Registration (Step 3/3)' that displays the End User License Agreement (EULA). Read through the EULA, and if you agree to the terms and conditions, tick both 'I AM 18 YEARS OF AGE OR OLDER', and 'I accept and agree to the terms of this End User License Agreement', and then click 'I Accept'. Note that if you are under the age of 18, and/or if you do not agree with the Terms of Use, then you will not be able to use the Portal.<br>[[File:Registration-step-3-of-3-v4.png|750px]] | |||
## Note: When you log back in on a later date, you might get a notice about the addition and/or updates to the EULA. For example, if you see a dialog box titled 'The EULA has been updated', verify that you are 18 or older, and if you would like to continue using the Portal, accept the updated EULA. | |||
# Upon accepting the Terms of Use, you should get a message (see below) informing you that the system is sending you an email verification with further instructions. Follow the instructions in this email.<br>[[File:Verify-email-v4.png|750px]] | |||
# Once you complete the instructions in the email, you should get a page that looks like the one below, which will have an alert entitled 'You successfully verified your email'. Fill in the information in the 'LOGIN' dialog box and click 'Login'.<br>[[File:email-verified-v3.png|750px]] | |||
# From there, you will be prompted to click 'Continue Registration'.<br>[[File:Continue-registration-v4.png|750px]] | |||
# Once you click 'Continue Registration', you will be brought to a page where you will be asked to complete registration.<br>[[File:Complete-registration-form-v4.png|750px]] | |||
# Confirm that the required information is correct; add any optional information you prefer to share; read and agree to the 'Terms and Conditions', and click the 'Continue' button. You should then see a page that shows 'Registration Complete', which includes a note to verify your call sign as the next step.<br>[[File:Registration-complete-v4.png|750px]] | |||
# To add and verify your call sign, go to the 'Account' dropdown menu and select 'Call signs'. You should see the 'Your call signs' dialog box.<br>[[File:Your-call-signs-v4.png|750px]]<br>Click 'Add a call sign', where you will see a form to add your call sign. Enter your call sign in the input field and click 'Add'.<br>[[File:Add-a-call-sign-v4.png|750px]]<br>You should then see a message stating 'The new call sign was successfully added'.<br>[[File:Call-sign-successfully-added-v4.png|750px]]<br>Clicking the 'Make Primary' button will make a desired call sign the primary call sign on the account, and you can delete a call sign from your account by simply clicking the 'Delete' button. | |||
## If you did not add your maidenhead to your profile, you will get a message at the top of the page stating: <br>[[File:Add-maidenhead-error-prompt-v4.png]]<br>above the 'Update your profile' form.<br>[[File:Update-your-profile-maidenhead-v4.png|750px]]<br>Add your maidenhead, confirm your password, and click 'Save'. | |||
## You will then see the following message above the 'Update your profile' form:<br>[[File:profile-updated-ok-message-v4.png|500px]] | |||
## Go back to Step 10, where you'll be prompted to add your call sign.<br> | |||
# On the 'Your call signs' UI, click 'Verify'. This will take you to a screen that details the process of verification.<br>[[File:Verify-call-sign-prompt-2-v4.png|750px]] | |||
# Click on the green 'Verify' button: you should see an alert saying 'Your request to verify your callsign [$call sign] has been submitted', which will create a ticket for the Portal admins to verify your call sign.<br>[[File:Callsign-is-verified-v4.png|750px]]<br>You can check the ticket by going to the 'Tickets' dropdown menu, selecting 'View my tickets', where you see it listed. To see the details of the ticket, click 'View'.<br>[[File:View-ticket-request-details-v4.png|500px]] | |||
## Note that once your call sign has been verified, you will no longer see the ticket in the list. Alternatively, you can confirm that your call sign has been verified by going to 'Account' > 'Call signs', and the status of your call sign verification will be displayed in the 'Your call signs' dialog box. Once your call sign has been verified, you will be able to request address space.<br>[[File:Verified-call-sign-v4.png|750px]] | |||
== Requesting Address Space (Beginner Friendly Steps) == | |||
This series of steps is aimed at users who are either new to requesting 44Net address space, need a refresher, or would like to streamline the process. Otherwise, you can also request address space via the Network list in the 'Requesting Address Space (via Network List)' and 'Requesting Address Space for BGP Use (via Network List)' sections below. | |||
# | # Under the 'Networks' menu, select 'Request addresses'. Note that you can also request address space on the Dashboard by clicking 'Request address space'.<br>[[File:request-address-space-dashboard-v4.png|750px]] | ||
# You should see a dialog box entitled 'Request Address Space'. Select your address type (should be IPv4, as IPv6 is not currently available), use case, and click 'Continue'. Please see the below instructions for your particular use case.<br>[[File:Request-address-space-form-v3.png|750px]] | |||
=== Use Case: IPIP Tunnel Mesh, Radio, Globally Unique Space, or General Address Assignment === | |||
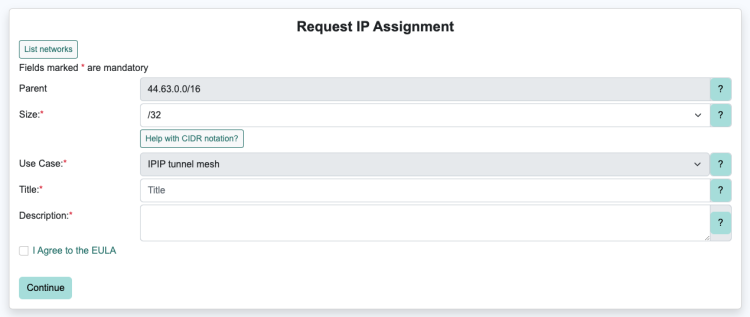
# If you selected IPIP tunnel mesh, radio, globally unique space, or general address assignment as your use case, you will see a dialog box entitled 'Request IP Assignment'. Fill out the 'Request IP Assignment' dialog box with the required information; agree to the EULA; and click 'Continue'.<br>[[File:Request-ip-assignment-v4.png|750px]] | |||
# You will then see the following note thanking you for requesting address space from ARDC, which includes detailed information about next steps.<br>[[File:Ty-for-requesting-address-space-v4.png|750px]] | |||
# Once your address space has been assigned, you can proceed to step 6 under 'Requesting Address Space (via Network List)'. | |||
=== Use Case: BGP Direct Announce === | |||
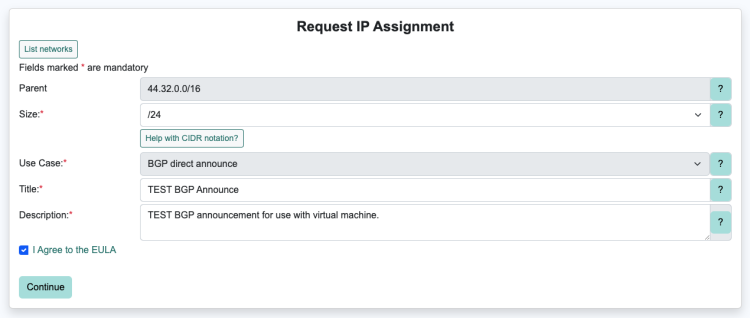
# | #If you selected 'BGP Direct Announce' as your use case, you will see a dialog box entitled 'Request IP Assignment'. Fill out the 'Request IP Assignment' dialog box with the required information, agree to the EULA, and click 'Continue'.<br>[[File:Request-ip-assignment-for-bgp-v4.png|750px]] | ||
# Proceed to step 3 under 'Requesting Address Space for BGP Use (via Network List)'. | |||
=== Other Use Cases === | |||
Selecting any of the below use cases will give you a dialog box that provides more details about the network: | |||
* AREDN | |||
* HAMNET | |||
* HamWAN | |||
== Requesting Address Space (via Network List) == | |||
[[File: | # Under the 'Networks' menu, select 'All IPv4 Networks'. | ||
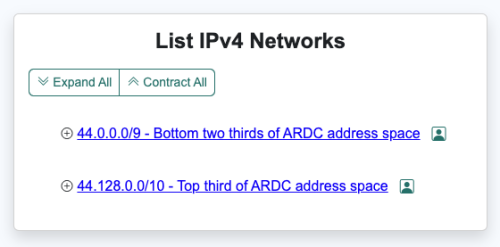
# In the 'List IPv4 Networks' dialog box, click the + sign to expand a line, or use the 'Expand All' button.<br>[[File:List-ipv4-networks-v4.png|500px]] | |||
# Scroll to look for the address space you are looking for (e.g., 44.63.0.0/16 - IPIP Mesh Assignments) and click on the green clipboard icon to the right of the assignment to request an assignment.<br>[[File:Request-network-assignment-v4.png|750px]] | |||
# Fill out the 'Request IP Assignment' dialog box with the required information, and click 'Continue'.<br>[[File:Request-ip-assignment-v4-via-network-list.png|750px]]<br>You will see the dialog box titled 'Thank you for requesting address space from ARDC' (see step 2 under 'Use Case: IPIP Tunnel Mesh, Radio, Globally Unique Space, or General Address Assignment'), which includes detailed information about next steps. | |||
# To confirm that your address space has been successfully requested, you can go to 'Tickets' > 'View my tickets' to see if the request is in your ticket list.<br>Note that you may be asked to provide more information to the Ticket Handler about your request before your address space is assigned.<br>[[File:Confirm-address-request-in-tickets-v4.png|750px]]<br>[[File:Justification-for-address-space-v4.png|750px]] | |||
# Once your space has been assigned (and the associated ticket has been closed), you can view your IPv4 networks by going to 'Networks' > 'my IPv4 networks', where your network detail(s) will be provided.<br>[[File:Network-detail-of-requested-address-space-v4.png|750px]] | |||
== Adding DNS Records to a Subdomain == | |||
[[File: | # On the 'DNS' dropdown menu, select 'My subdomains' and then click 'Request a subdomain' in the 'My subdomains' dialog box.<br>[[File:my-subdomain-dialog-box.png|750px]] | ||
# Choose your domain, determine a name for your subdomain (i.e., most likely your call sign), click 'Create request', and you should see a note<br>[[File:Create-new-subdomain-request-v4.png|750px]]<br>saying 'Subdomain $[call sign].ampr.org has been assigned to you'.<br>[[File:Subdomain-has-been-assigned-to-you-v4.png|750px]]<br>Please be aware that if your call sign has not been verified or if you are requesting a domain other than $[call sign].ampr.org, a ticket will be opened for an administrator to review your request(s).<br>You can verify that your subdomain has been created by going to 'DNS' > 'My subdomains', and your subdomain should appear in the 'My subdomains' dialog box.<br>[[File:Subdomain-creation-verification-v4.png|750px]] | |||
# Once your subdomain has been created, you can add DNS records by going to 'DNS' > 'My subdomains', and click the icon under 'Actions' in the 'Subdomains' dialog box (see step 2 above). | |||
# In the 'Resource records for $subdomain.ampr.org', click 'Add a resource record'.<br>[[File:add-resource-record.png|750px]] | |||
# In the 'Create resource record for $subdomain.ampr.org', select the record type, and click 'Next' (see below).<br>[[File:create-resource-record-step-1.png|750px]] | |||
# Add the details relevant to the record type and ensure that Active is checked, click 'Create',<br>[[File:Create-resource-record-step-2-v4.png|750px]]<br>and you should get an alert that says 'Subdomain Record created successfully'.<br>[[File:Subdomain-record-created-successfully-v4.png|750px]] | |||
# You can verify that your record has been created by going to 'DNS' > 'My records' and look for the record that is associated with your subdomain.<br>[[File:record-associated-with-subdomain.png|750px]] | |||
== Creating a Gateway == | |||
[[File: | # Go to 'Networks' > 'My gateways' and click 'Create a Gateway' in the 'My Gateways' dialog box.<br>[[File:my-gateways.png|750px]] | ||
# In the 'Create new Gateway' dialog box, fill out all required fields (Hostname can be left blank), click 'Add', and you should get an alert saying 'Gateway created successfully.'<br>[[File:create-new-gateway.png|750px]]<br>[[File:Gateway-created-successfully-v4.png|750px]] | |||
# To add a subnet to your gateway, click the edit button under 'Actions' (see step 2 above). You will be taken to an 'Update Gateway' dialog box, which includes information about your gateway. Click 'Add New Network'.<br>[[File:Update-gateway-v4.png|750px]] | |||
# You will then see an 'Add New Network' dialog box (see below). Select a network from your list of networks; leave 'Find Network' field blank; and then click 'Add'. You should see an alert titled 'Network Successfully Linked to this Gateway' (see below). You can verify that your network has been added by clicking 'View My Gateways' and seeing said gateway under 'My Gateways' (see below).<br>[[File:add-new-network-v3.png|750px]]<br>[[File:Network-successfully-linked-to-gateway-v4.png|750px]]<br>[[File:verify-my-gateways-v3.2.png|750px]] | |||
# If you would like to add someone else's network using their unique code, click 'Add New Network', which will take you to the 'Add New Network' dialog box. Fill out the required information, and click 'Find'. You should have a 44Net address displaying in the 'Network found' field. Click 'Add', and you should see an alert titled 'Network Successfully Linked to this Gateway' (see step 4 above).<br>[[File:Add-network-to-gateway-v4.png|750px]] | |||
# You can add or remove linked networks by clicking the 'Add New Network' or 'Unlink' button, respectively (see steps 3 and 4 above). | |||
== Requesting Address Space for BGP Use (via Network List) == | |||
# From the 'Networks' dropdown menu, go to 'All IPv4 networks', and request a BGP assignment (e.g., 44.31.0.0/16 - BGP Assignments) by clicking on the 'Request Assignment' icon to the right of the listed assignment (green clipboard).<br>[[File:Request-bgp-assignment-v4.png|500px]] | |||
# On the 'Request IP Assignment' dialog box, fill out the mandatory fields, agree to the EULA, and click 'Continue'.<br>[[File:Request-ip-assignment-for-bgp-v4.png|750px]] | |||
# You should see a 'BGP Information' dialog box on the UI. Fill out the mandatory information, click 'Submit Request',<br>[[File:Bgp-information-v4.png|750px]]<br>and you should now see 'Thank you for requesting address space from ARDC' (see Step 2 under 'Use Case: IPIP Tunnel Mesh, Radio, Globally Unique Space, or General Address Assignment'). Note that the justification must be at least 100 characters. | |||
# You can confirm the address has been successfully requested by going to 'Tickets' > 'View my tickets', and your request should be visible in the 'List your tickets' dialog box. Once the ticket has been closed, you should see the allocation listed in your IPv4 networks. <br>[[File:all-ipv4-allocations-by-user.png|500px]]<br>Clicking 'Edit' will bring you to the 'Update Network' dialog box, where you can make appropriate updates, download the EULA, download the Letter of Authorization (LOA), etc (see below).<br>[[File:update-network-v3.2.png|750px]] | |||
== v2.0 Features == | |||
=== Dashboard === | |||
After logging in, you should see your Dashboard. If your email has been verified, you should see an 'Account' menu and a 'Tickets' menu at the top right-hand side of the UI. If you have been granted additional privileges, you will see additional menus for those related privileges. The Dashboard will also display information boxes, such as your latest login, IP, and timestamp, or outstanding notifications you need to be aware of. | |||
[[File: | [[File:Dashboard-v4.png|750px]] | ||
=== Help === | |||
The 'Help' dropdown menu provides the following options: | |||
*'''View EULA''': displays a copy of the Portal's End User License Agreement (EULA) | |||
* '''2FA''': defines 2FA and provides details on multiple 2FA options to choose from to add to your account | |||
* '''LoT''': provides an overview of Level of Trust (LoT), how it works, and how to increase your LoT | |||
* '''CIDR''': provides an overview of Classless Inter-Domain Routing (CIDR) | |||
* '''Limits''': provides an explanation of your specific limits on Portal activities, which are directly related to your current LoT | |||
* '''Member pages''': These are pages generated by other members | |||
* '''Subdomains''': provides an overview of subdomains and DNS and steps needed to request subdomains | |||
* '''Passwords''': provides password requirements and recommendations for how to create a strong password for your Portal account | |||
* '''Glossary''': includes definitions for terminology relevant to using the Portal | |||
* '''Community''': includes links to ARDC's Groups.io group, along with links to relevant subgroups | |||
* '''Lookup callsign''': allows you to look up call signs of other users on the Portal | |||
=== Maps === | |||
* '''Distance''': allows you to perform distance and bearing calculations | |||
* '''Maidenhead''': allows you to generate a map from a Maidenhead locator | |||
* '''Conversions''': allows you to convert from DMS to lat/long and back | |||
* '''World map''': a map that displays the approximate location for all members | |||
=== | === Account === | ||
The 'Account' dropdown menu provides the following options: | |||
* '''Profile''': allows you to view and update your personal data | |||
* '''Call signs''': allows you to add/remove/verify your call sign(s) | |||
* '''LoT entries''': lists your Level of Trust (LoT) entires | |||
* '''Verify address''': allows you to go through the address verification process, which is needed if you are requesting BGP announced address space | |||
* '''Organisations''': allows you to create organizations and view information of the organizations you are affiliated with | |||
* '''Notifications''': displays a list of user notifications | |||
* '''Notification types''': displays all notification types/options | |||
* '''View all notifications''': displays all your active notifications | |||
* '''Logs''': displays all your log entries | |||
* '''My public page''': displays any public pages you have added and provides the ability to add more | |||
* '''Delete my account''': allows a user to delete their account | |||
==== Profile ==== | ==== Profile ==== | ||
A user's profile is always available, whether or not a their email address has been verified. Through the profile, a user has access to the following: | |||
* Personal Information (PII) a user chooses to share with ARDC | |||
==== Level of Trust (LoT) & LoT | * The ability for a user to update their account | ||
* The ability for a user to enable 2FA on their account | |||
Changes made to the profile will require the current password to be entered at the bottom of the page and clicking 'Save' for changes take effect. | |||
==== Call signs ==== | |||
Here, the user is presented with a list of all call signs they have entered. A user can add up to a maximum of five call signs (can be adjusted on a per user basis), with only one call sign being the primary. Clubs and organization can add up to 10 of their own call signs by default. Call signs must be verified before they can be used. All verified call signs must be unique within the system. | |||
==== Level of Trust (LoT) & LoT Entries ==== | |||
The Portal uses various methods to verify users and thus gain 'trust', which is referred to as the 'Level of Trust' (LoT). LoT is used to increase confidence that a user is who they say they are and record that there is a skill set and knowledge that is needed to assign responsibilities to said user in the Portal. | |||
As various tasks are accomplished, such as verification of email and/or call signs, points will be assigned to a users' account. The more points a user has, the higher the LoT. You can learn more about LoT by going to either 'Help' > 'LoT' or 'Account' > 'LoT info' on the navigation menu. | |||
The LoT List is a read-only list for LoT entries of a user. You can find this list by going to 'Account' > 'LoT list'. A user will have at least one entry that shows that their email address was verified. Below are a few examples of what accesses are granted based on a user's LoT. | |||
* Email is not verified | |||
** User can login, access their own profile, delete their account | |||
* Call sign is not verified | |||
** User cannot access DNS records or request address space | |||
==== Notifications ==== | ==== Notifications ==== | ||
The system informs users of various events via notifications.<br>[[File:Notification-types-v4.png|750px]] | |||
Mandatory Notifications: | |||
* Contact Member | |||
* Password Reset | |||
* Ticket Reminder | |||
* LoT Expiry | |||
* LoT Added | |||
* Account Expiry | |||
* LOA Expiry | |||
Optional Notifications: | |||
* Login | |||
* Profile Update | |||
* Ticket Assigned | |||
* ...and many more | |||
Clicking on 'Methods' (under the 'Actions' column, see above) will allow the user to choose a preferred method of notification:<br>[[File:notification-methods.png|750px]] | |||
* Email | |||
* SMS | |||
* many more coming soon, e.g. Zulip, Signal, Telegram... | |||
=== Tickets === | === Tickets === | ||
Tickets track tasks, along with their associated progress, within the Portal. Items managed by tickets include, but are not limited to: | |||
* Call sign verification | |||
* Request(s) for resources (e.g., address space) | |||
The 'Tickets' dropdown menu will allow the user to view all of their tickets, create a new support ticket, and serves as a reference to check the status of any user requests. | |||
Ticket types that are not 'Support' are available within the system and are accessible to a user in a specific circumstance. | |||
=== Domain Name System (DNS) Records === | === Domain Name System (DNS) Records === | ||
ARDC manages the ampr.org domain for its own use and supports Portal user needs. | |||
Once a user's call sign is verified, they should see the DNS dropdown menu with submenu options 'Domains', 'My subdomains', and 'My records'. | |||
[[File:dns-menu.png|750px]] | |||
=== Networks === | === Networks === | ||
Once a user's call sign is verified, they should see the 'Networks' dropdown menu with submenu options 'Request addresses', 'All IPv4 networks', 'All IPv6 networks', 'All gateways', 'My IPv4 networks', 'My IPv6 networks', 'My gateways'. | |||
=== Contact === | === Contact === | ||
Clicking 'Contact' takes you to the 'CONTACT US' form, where you can reach out to Portal admins with inquiries, reporting issues, etc. | |||
[[File:contact-us-v3.png|750px]] | |||
=== API === | |||
An [[API]] enables programs to access data maintained in the portal. | |||
== Helpful Resources == | == Helpful Resources == | ||
'''Subnet calculator''': [https://www.calculator.net/ip-subnet-calculator.html https://www.calculator.net/ip-subnet-calculator.html] | |||
Revision as of 19:13, 24 October 2024
DRAFT - In Progress
ARDC Portal 2.0 Technical Documentation
By Rebecca Key KO4KVG
Version: 4 (October 22, 2024)
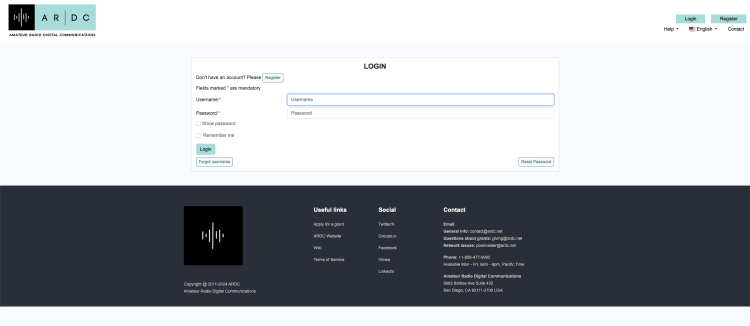
Accessing the Portal
Go to https://portal.ampr.org, where you should see the following UI:
Registration
- Click on the 'Register' button at the top right of the UI (see 'Accessing the Portal', step 1) or on the 'Register' button in the 'LOGIN' dialog box. This will take you to the following screen:

- Complete the field for 'What should we call you?:' and click 'Continue'.
- In the dialog box titled 'Registration (Step 2/3)', you will be introduced to help icons ('?') that will provide you useful information throughout the Portal. Click 'Close' to exit the dialog box.

From there, you enter your Given name, Family name, email address, a username (used to login) and a password, then click 'Continue'.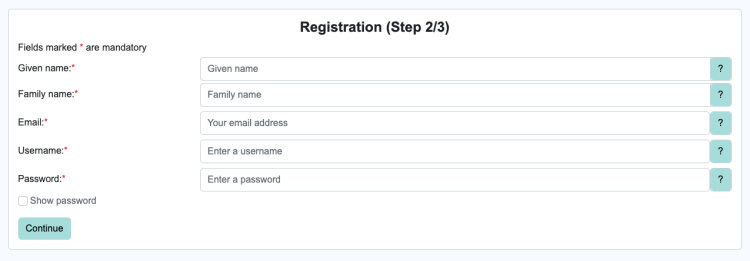
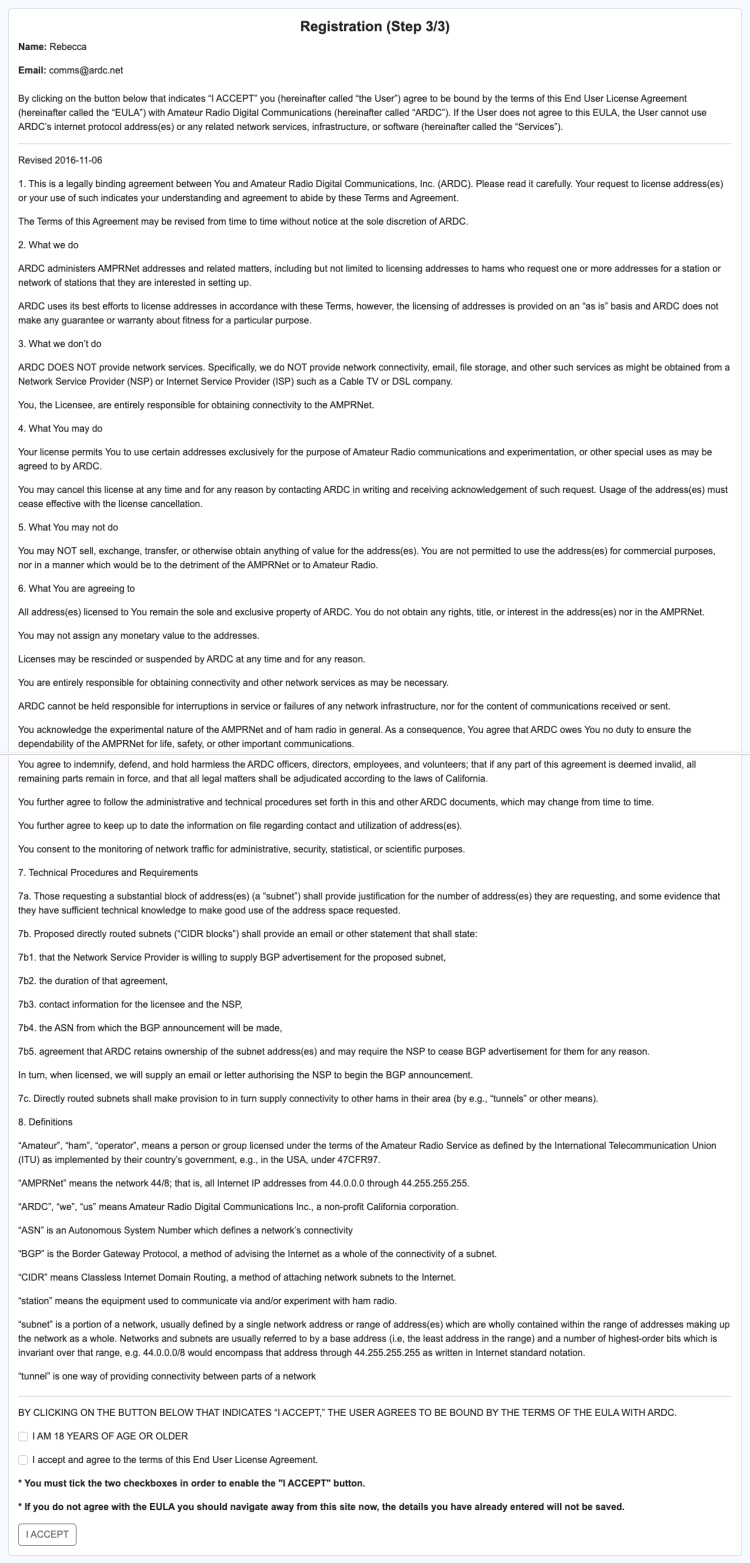
- You should then arrive at a dialog box titled 'Registration (Step 3/3)' that displays the End User License Agreement (EULA). Read through the EULA, and if you agree to the terms and conditions, tick both 'I AM 18 YEARS OF AGE OR OLDER', and 'I accept and agree to the terms of this End User License Agreement', and then click 'I Accept'. Note that if you are under the age of 18, and/or if you do not agree with the Terms of Use, then you will not be able to use the Portal.
- Note: When you log back in on a later date, you might get a notice about the addition and/or updates to the EULA. For example, if you see a dialog box titled 'The EULA has been updated', verify that you are 18 or older, and if you would like to continue using the Portal, accept the updated EULA.
- Upon accepting the Terms of Use, you should get a message (see below) informing you that the system is sending you an email verification with further instructions. Follow the instructions in this email.

- Once you complete the instructions in the email, you should get a page that looks like the one below, which will have an alert entitled 'You successfully verified your email'. Fill in the information in the 'LOGIN' dialog box and click 'Login'.

- From there, you will be prompted to click 'Continue Registration'.

- Once you click 'Continue Registration', you will be brought to a page where you will be asked to complete registration.
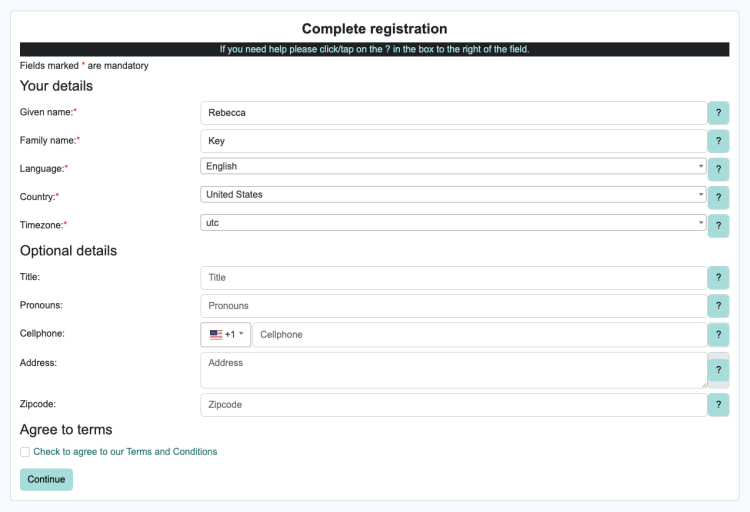
- Confirm that the required information is correct; add any optional information you prefer to share; read and agree to the 'Terms and Conditions', and click the 'Continue' button. You should then see a page that shows 'Registration Complete', which includes a note to verify your call sign as the next step.

- To add and verify your call sign, go to the 'Account' dropdown menu and select 'Call signs'. You should see the 'Your call signs' dialog box.

Click 'Add a call sign', where you will see a form to add your call sign. Enter your call sign in the input field and click 'Add'.
You should then see a message stating 'The new call sign was successfully added'.
Clicking the 'Make Primary' button will make a desired call sign the primary call sign on the account, and you can delete a call sign from your account by simply clicking the 'Delete' button.- If you did not add your maidenhead to your profile, you will get a message at the top of the page stating:

above the 'Update your profile' form.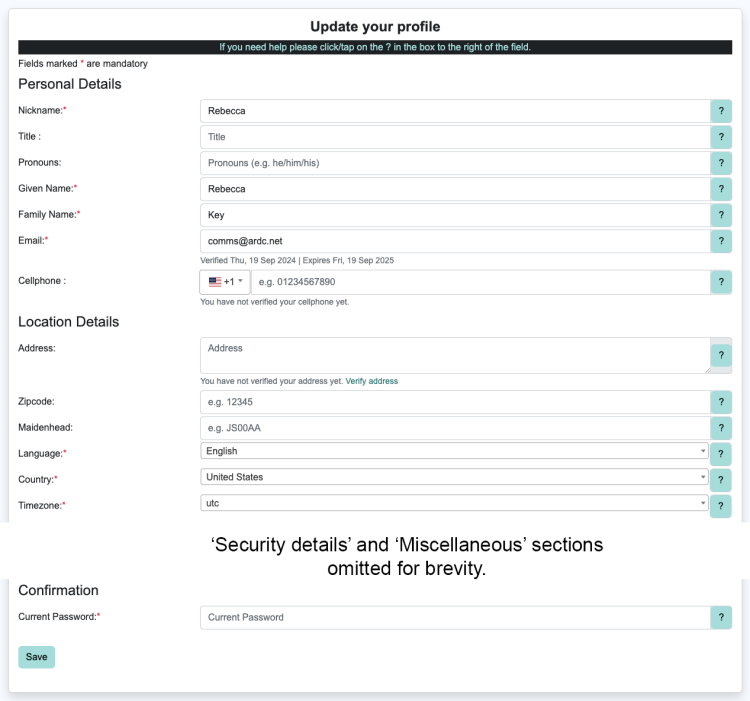
Add your maidenhead, confirm your password, and click 'Save'. - You will then see the following message above the 'Update your profile' form:

- Go back to Step 10, where you'll be prompted to add your call sign.
- If you did not add your maidenhead to your profile, you will get a message at the top of the page stating:
- On the 'Your call signs' UI, click 'Verify'. This will take you to a screen that details the process of verification.
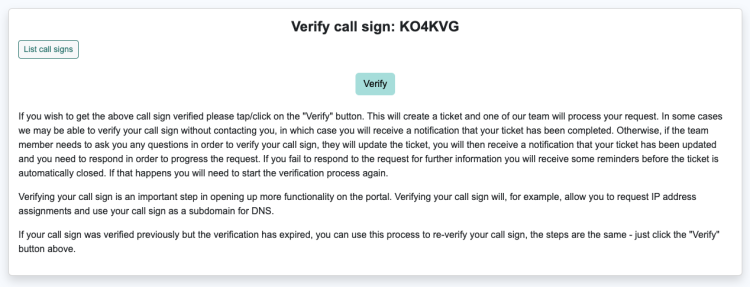
- Click on the green 'Verify' button: you should see an alert saying 'Your request to verify your callsign [$call sign] has been submitted', which will create a ticket for the Portal admins to verify your call sign.

You can check the ticket by going to the 'Tickets' dropdown menu, selecting 'View my tickets', where you see it listed. To see the details of the ticket, click 'View'.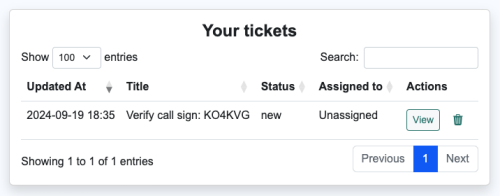
- Note that once your call sign has been verified, you will no longer see the ticket in the list. Alternatively, you can confirm that your call sign has been verified by going to 'Account' > 'Call signs', and the status of your call sign verification will be displayed in the 'Your call signs' dialog box. Once your call sign has been verified, you will be able to request address space.

- Note that once your call sign has been verified, you will no longer see the ticket in the list. Alternatively, you can confirm that your call sign has been verified by going to 'Account' > 'Call signs', and the status of your call sign verification will be displayed in the 'Your call signs' dialog box. Once your call sign has been verified, you will be able to request address space.
Requesting Address Space (Beginner Friendly Steps)
This series of steps is aimed at users who are either new to requesting 44Net address space, need a refresher, or would like to streamline the process. Otherwise, you can also request address space via the Network list in the 'Requesting Address Space (via Network List)' and 'Requesting Address Space for BGP Use (via Network List)' sections below.
- Under the 'Networks' menu, select 'Request addresses'. Note that you can also request address space on the Dashboard by clicking 'Request address space'.

- You should see a dialog box entitled 'Request Address Space'. Select your address type (should be IPv4, as IPv6 is not currently available), use case, and click 'Continue'. Please see the below instructions for your particular use case.

Use Case: IPIP Tunnel Mesh, Radio, Globally Unique Space, or General Address Assignment
- If you selected IPIP tunnel mesh, radio, globally unique space, or general address assignment as your use case, you will see a dialog box entitled 'Request IP Assignment'. Fill out the 'Request IP Assignment' dialog box with the required information; agree to the EULA; and click 'Continue'.
- You will then see the following note thanking you for requesting address space from ARDC, which includes detailed information about next steps.

- Once your address space has been assigned, you can proceed to step 6 under 'Requesting Address Space (via Network List)'.
Use Case: BGP Direct Announce
- If you selected 'BGP Direct Announce' as your use case, you will see a dialog box entitled 'Request IP Assignment'. Fill out the 'Request IP Assignment' dialog box with the required information, agree to the EULA, and click 'Continue'.
- Proceed to step 3 under 'Requesting Address Space for BGP Use (via Network List)'.
Other Use Cases
Selecting any of the below use cases will give you a dialog box that provides more details about the network:
- AREDN
- HAMNET
- HamWAN
Requesting Address Space (via Network List)
- Under the 'Networks' menu, select 'All IPv4 Networks'.
- In the 'List IPv4 Networks' dialog box, click the + sign to expand a line, or use the 'Expand All' button.
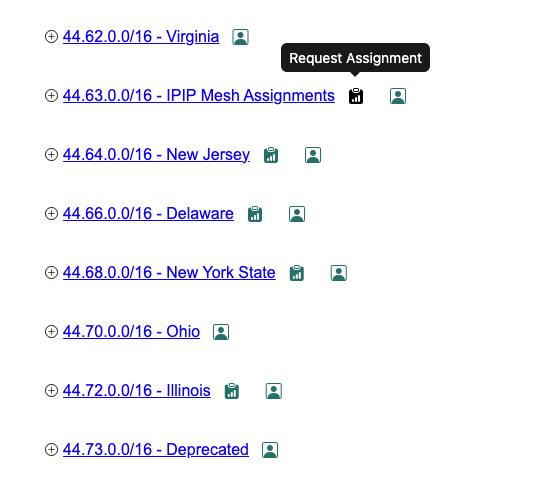
- Scroll to look for the address space you are looking for (e.g., 44.63.0.0/16 - IPIP Mesh Assignments) and click on the green clipboard icon to the right of the assignment to request an assignment.
- Fill out the 'Request IP Assignment' dialog box with the required information, and click 'Continue'.
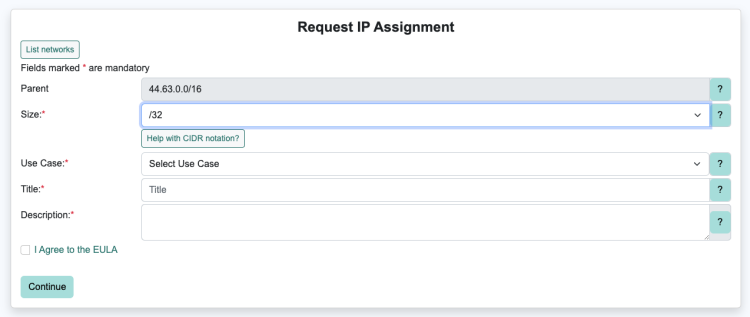
You will see the dialog box titled 'Thank you for requesting address space from ARDC' (see step 2 under 'Use Case: IPIP Tunnel Mesh, Radio, Globally Unique Space, or General Address Assignment'), which includes detailed information about next steps. - To confirm that your address space has been successfully requested, you can go to 'Tickets' > 'View my tickets' to see if the request is in your ticket list.
Note that you may be asked to provide more information to the Ticket Handler about your request before your address space is assigned.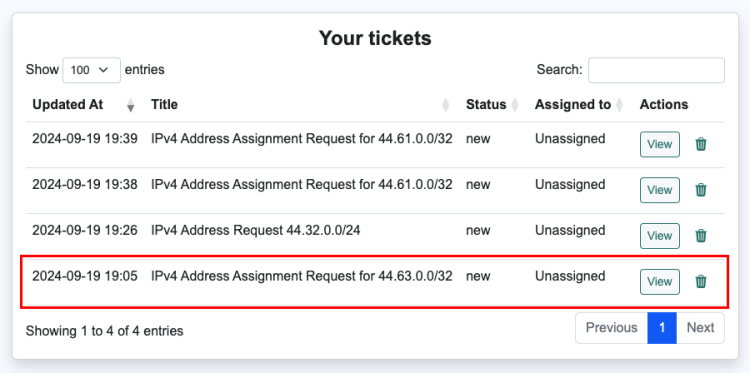
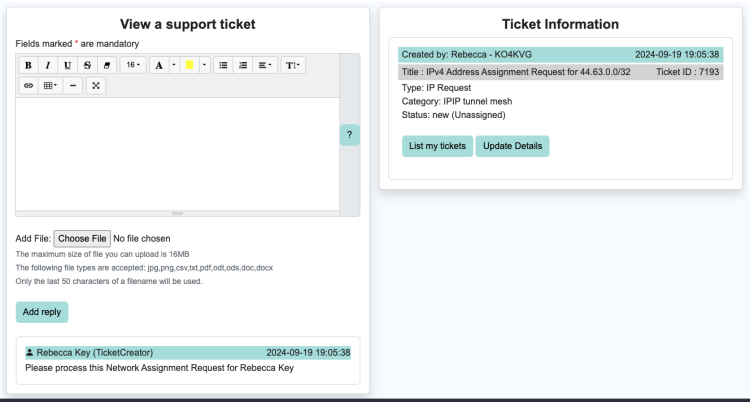
- Once your space has been assigned (and the associated ticket has been closed), you can view your IPv4 networks by going to 'Networks' > 'my IPv4 networks', where your network detail(s) will be provided.

Adding DNS Records to a Subdomain
- On the 'DNS' dropdown menu, select 'My subdomains' and then click 'Request a subdomain' in the 'My subdomains' dialog box.

- Choose your domain, determine a name for your subdomain (i.e., most likely your call sign), click 'Create request', and you should see a note
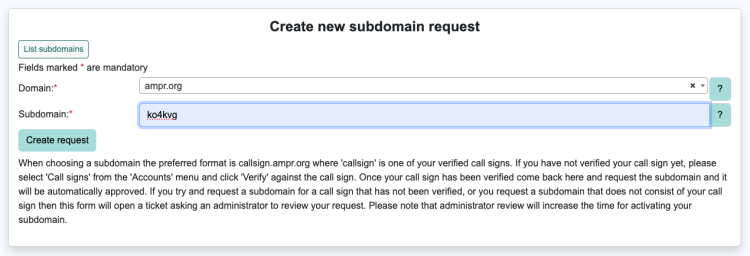
saying 'Subdomain $[call sign].ampr.org has been assigned to you'.
Please be aware that if your call sign has not been verified or if you are requesting a domain other than $[call sign].ampr.org, a ticket will be opened for an administrator to review your request(s).
You can verify that your subdomain has been created by going to 'DNS' > 'My subdomains', and your subdomain should appear in the 'My subdomains' dialog box.
- Once your subdomain has been created, you can add DNS records by going to 'DNS' > 'My subdomains', and click the icon under 'Actions' in the 'Subdomains' dialog box (see step 2 above).
- In the 'Resource records for $subdomain.ampr.org', click 'Add a resource record'.

- In the 'Create resource record for $subdomain.ampr.org', select the record type, and click 'Next' (see below).

- Add the details relevant to the record type and ensure that Active is checked, click 'Create',
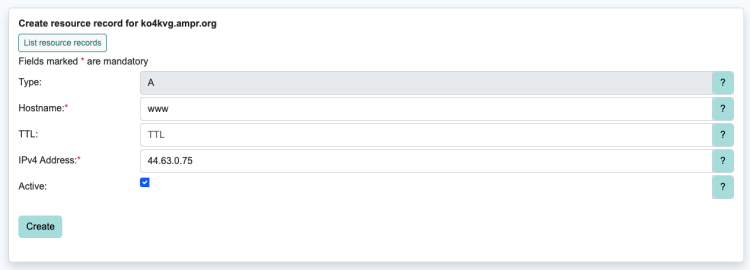
and you should get an alert that says 'Subdomain Record created successfully'.
- You can verify that your record has been created by going to 'DNS' > 'My records' and look for the record that is associated with your subdomain.

Creating a Gateway
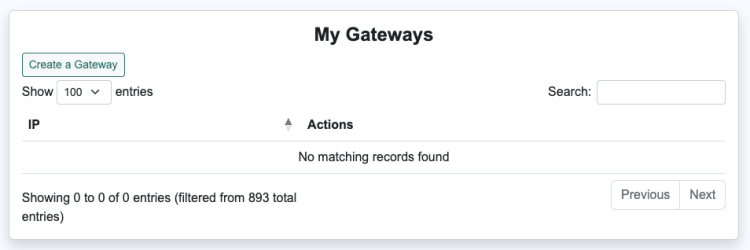
- Go to 'Networks' > 'My gateways' and click 'Create a Gateway' in the 'My Gateways' dialog box.
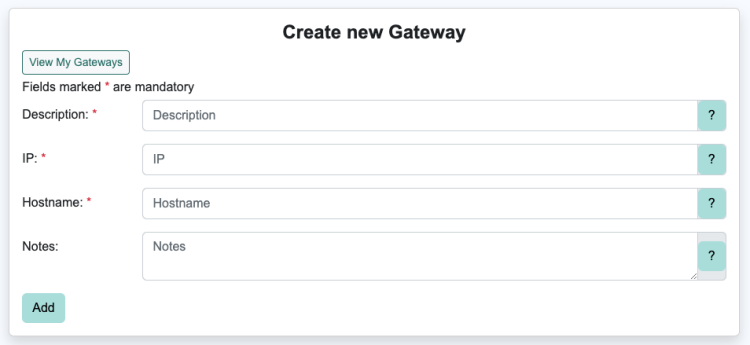
- In the 'Create new Gateway' dialog box, fill out all required fields (Hostname can be left blank), click 'Add', and you should get an alert saying 'Gateway created successfully.'

- To add a subnet to your gateway, click the edit button under 'Actions' (see step 2 above). You will be taken to an 'Update Gateway' dialog box, which includes information about your gateway. Click 'Add New Network'.
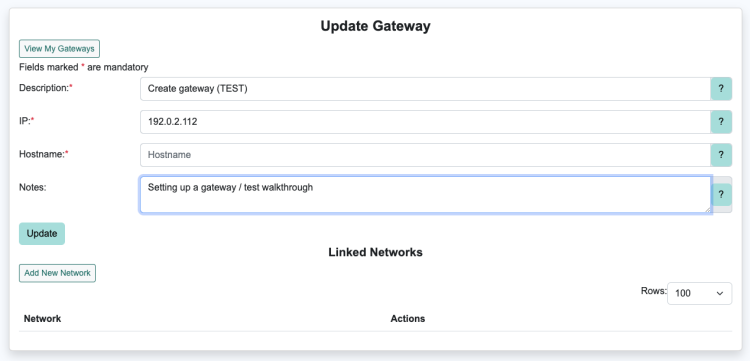
- You will then see an 'Add New Network' dialog box (see below). Select a network from your list of networks; leave 'Find Network' field blank; and then click 'Add'. You should see an alert titled 'Network Successfully Linked to this Gateway' (see below). You can verify that your network has been added by clicking 'View My Gateways' and seeing said gateway under 'My Gateways' (see below).
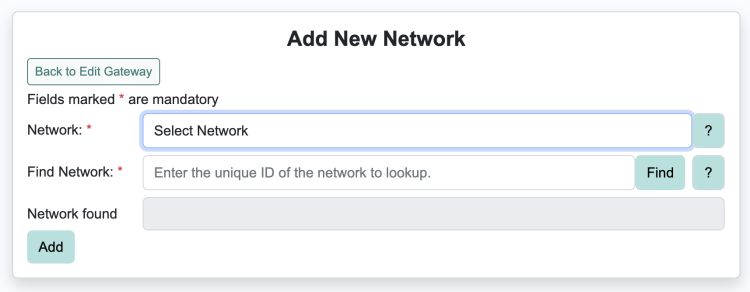

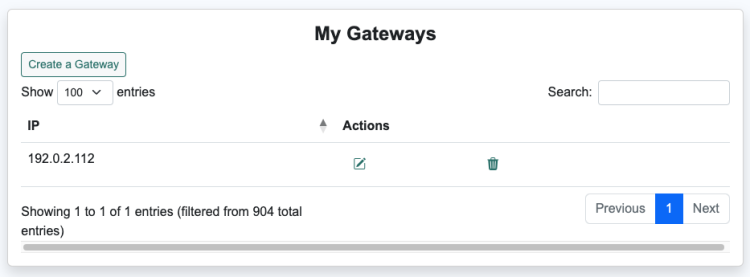
- If you would like to add someone else's network using their unique code, click 'Add New Network', which will take you to the 'Add New Network' dialog box. Fill out the required information, and click 'Find'. You should have a 44Net address displaying in the 'Network found' field. Click 'Add', and you should see an alert titled 'Network Successfully Linked to this Gateway' (see step 4 above).

- You can add or remove linked networks by clicking the 'Add New Network' or 'Unlink' button, respectively (see steps 3 and 4 above).
Requesting Address Space for BGP Use (via Network List)
- From the 'Networks' dropdown menu, go to 'All IPv4 networks', and request a BGP assignment (e.g., 44.31.0.0/16 - BGP Assignments) by clicking on the 'Request Assignment' icon to the right of the listed assignment (green clipboard).

- On the 'Request IP Assignment' dialog box, fill out the mandatory fields, agree to the EULA, and click 'Continue'.

- You should see a 'BGP Information' dialog box on the UI. Fill out the mandatory information, click 'Submit Request',

and you should now see 'Thank you for requesting address space from ARDC' (see Step 2 under 'Use Case: IPIP Tunnel Mesh, Radio, Globally Unique Space, or General Address Assignment'). Note that the justification must be at least 100 characters. - You can confirm the address has been successfully requested by going to 'Tickets' > 'View my tickets', and your request should be visible in the 'List your tickets' dialog box. Once the ticket has been closed, you should see the allocation listed in your IPv4 networks.
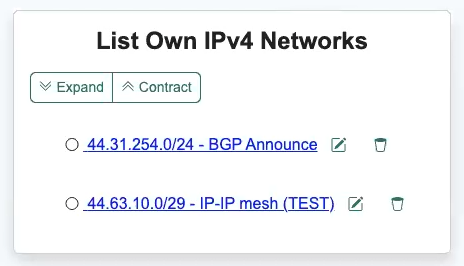
Clicking 'Edit' will bring you to the 'Update Network' dialog box, where you can make appropriate updates, download the EULA, download the Letter of Authorization (LOA), etc (see below).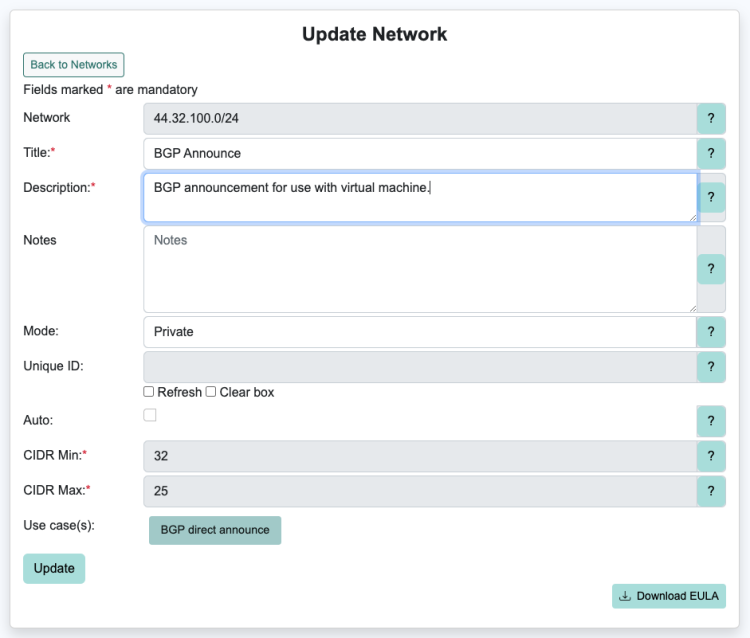
v2.0 Features
Dashboard
After logging in, you should see your Dashboard. If your email has been verified, you should see an 'Account' menu and a 'Tickets' menu at the top right-hand side of the UI. If you have been granted additional privileges, you will see additional menus for those related privileges. The Dashboard will also display information boxes, such as your latest login, IP, and timestamp, or outstanding notifications you need to be aware of.
Help
The 'Help' dropdown menu provides the following options:
- View EULA: displays a copy of the Portal's End User License Agreement (EULA)
- 2FA: defines 2FA and provides details on multiple 2FA options to choose from to add to your account
- LoT: provides an overview of Level of Trust (LoT), how it works, and how to increase your LoT
- CIDR: provides an overview of Classless Inter-Domain Routing (CIDR)
- Limits: provides an explanation of your specific limits on Portal activities, which are directly related to your current LoT
- Member pages: These are pages generated by other members
- Subdomains: provides an overview of subdomains and DNS and steps needed to request subdomains
- Passwords: provides password requirements and recommendations for how to create a strong password for your Portal account
- Glossary: includes definitions for terminology relevant to using the Portal
- Community: includes links to ARDC's Groups.io group, along with links to relevant subgroups
- Lookup callsign: allows you to look up call signs of other users on the Portal
Maps
- Distance: allows you to perform distance and bearing calculations
- Maidenhead: allows you to generate a map from a Maidenhead locator
- Conversions: allows you to convert from DMS to lat/long and back
- World map: a map that displays the approximate location for all members
Account
The 'Account' dropdown menu provides the following options:
- Profile: allows you to view and update your personal data
- Call signs: allows you to add/remove/verify your call sign(s)
- LoT entries: lists your Level of Trust (LoT) entires
- Verify address: allows you to go through the address verification process, which is needed if you are requesting BGP announced address space
- Organisations: allows you to create organizations and view information of the organizations you are affiliated with
- Notifications: displays a list of user notifications
- Notification types: displays all notification types/options
- View all notifications: displays all your active notifications
- Logs: displays all your log entries
- My public page: displays any public pages you have added and provides the ability to add more
- Delete my account: allows a user to delete their account
Profile
A user's profile is always available, whether or not a their email address has been verified. Through the profile, a user has access to the following:
- Personal Information (PII) a user chooses to share with ARDC
- The ability for a user to update their account
- The ability for a user to enable 2FA on their account
Changes made to the profile will require the current password to be entered at the bottom of the page and clicking 'Save' for changes take effect.
Call signs
Here, the user is presented with a list of all call signs they have entered. A user can add up to a maximum of five call signs (can be adjusted on a per user basis), with only one call sign being the primary. Clubs and organization can add up to 10 of their own call signs by default. Call signs must be verified before they can be used. All verified call signs must be unique within the system.
Level of Trust (LoT) & LoT Entries
The Portal uses various methods to verify users and thus gain 'trust', which is referred to as the 'Level of Trust' (LoT). LoT is used to increase confidence that a user is who they say they are and record that there is a skill set and knowledge that is needed to assign responsibilities to said user in the Portal.
As various tasks are accomplished, such as verification of email and/or call signs, points will be assigned to a users' account. The more points a user has, the higher the LoT. You can learn more about LoT by going to either 'Help' > 'LoT' or 'Account' > 'LoT info' on the navigation menu.
The LoT List is a read-only list for LoT entries of a user. You can find this list by going to 'Account' > 'LoT list'. A user will have at least one entry that shows that their email address was verified. Below are a few examples of what accesses are granted based on a user's LoT.
- Email is not verified
- User can login, access their own profile, delete their account
- Call sign is not verified
- User cannot access DNS records or request address space
Notifications
The system informs users of various events via notifications.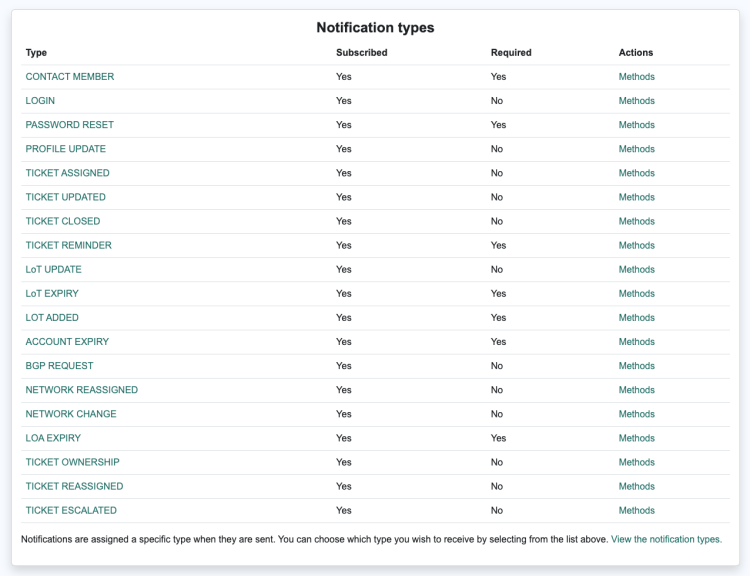
Mandatory Notifications:
- Contact Member
- Password Reset
- Ticket Reminder
- LoT Expiry
- LoT Added
- Account Expiry
- LOA Expiry
Optional Notifications:
- Login
- Profile Update
- Ticket Assigned
- ...and many more
Clicking on 'Methods' (under the 'Actions' column, see above) will allow the user to choose a preferred method of notification: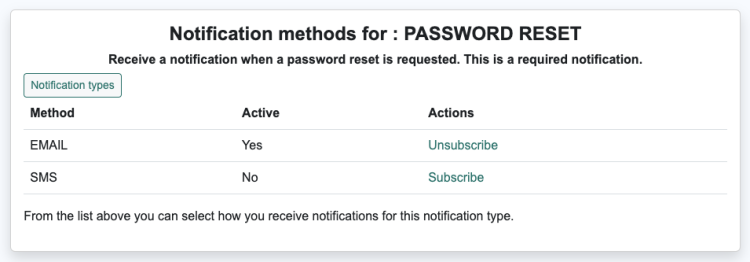
- SMS
- many more coming soon, e.g. Zulip, Signal, Telegram...
Tickets
Tickets track tasks, along with their associated progress, within the Portal. Items managed by tickets include, but are not limited to:
- Call sign verification
- Request(s) for resources (e.g., address space)
The 'Tickets' dropdown menu will allow the user to view all of their tickets, create a new support ticket, and serves as a reference to check the status of any user requests.
Ticket types that are not 'Support' are available within the system and are accessible to a user in a specific circumstance.
Domain Name System (DNS) Records
ARDC manages the ampr.org domain for its own use and supports Portal user needs.
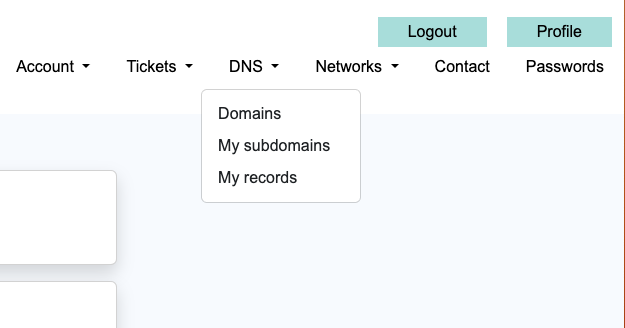
Once a user's call sign is verified, they should see the DNS dropdown menu with submenu options 'Domains', 'My subdomains', and 'My records'.
Networks
Once a user's call sign is verified, they should see the 'Networks' dropdown menu with submenu options 'Request addresses', 'All IPv4 networks', 'All IPv6 networks', 'All gateways', 'My IPv4 networks', 'My IPv6 networks', 'My gateways'.
Contact
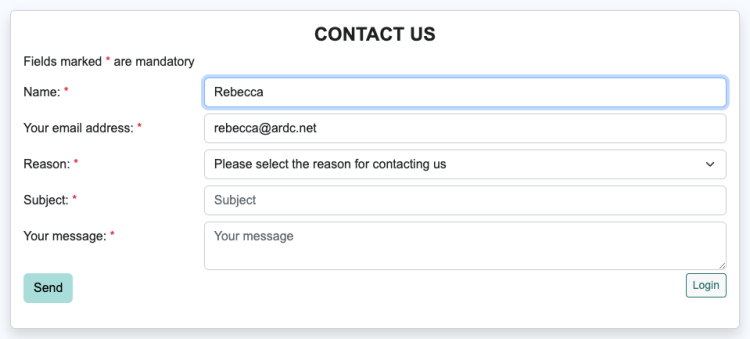
Clicking 'Contact' takes you to the 'CONTACT US' form, where you can reach out to Portal admins with inquiries, reporting issues, etc.
API
An API enables programs to access data maintained in the portal.
Helpful Resources
Subnet calculator: https://www.calculator.net/ip-subnet-calculator.html
