Organizations in the Portal: Difference between revisions
Add how-to category |
|||
| (One intermediate revision by one other user not shown) | |||
| Line 25: | Line 25: | ||
# To create an organization, go to ‘Account’ > ‘Organisations’, and you should see a ‘My Organisations’ dialog box, where ‘AMPRNet (Primary)’ is listed as the default.<br>[[File:My-organisation-create-new-organization.png|500px]] | # To create an organization, go to ‘Account’ > ‘Organisations’, and you should see a ‘My Organisations’ dialog box, where ‘AMPRNet (Primary)’ is listed as the default.<br>[[File:My-organisation-create-new-organization.png|500px]] | ||
# Click ‘Create a new organization’, where you should see the ‘Create a new organization’ dialog box that provides instructions on how to set up a new organization. Click ‘Continue’ to proceed.<br>[[File:Create-a-new-organization-dialog-box-instructions.png|750px]] | # Click ‘Create a new organization’, where you should see the ‘Create a new organization’ dialog box that provides instructions on how to set up a new organization. Click ‘Continue’ to proceed.<br>[[File:Create-a-new-organization-dialog-box-instructions.png|750px]] | ||
# You should now see the ‘Create a new organisation' form.<br>[[File:Create-new-organisation-form.png|750px]]<br>Fill out the required fields, click ‘Create Organisation’, and you will get a note saying ‘Your new organisation was created successfully.’<br>[[File:Org-created-successfully.png|750px]]<br>The new organization should also be listed in your ‘My Organisations’ dialog box, which you can access by going to ‘Account’ > ‘Organisations’. | # You should now see the ‘Create a new organisation' form.<br>[[File:Create-new-organisation-form.png|750px]]<br>Fill out the required fields, click ‘Create Organisation’, and you will get a note saying ‘Your new organisation was created successfully.’<br>[[File:Org-created-successfully.png|750px]]<br>The new organization should also be listed in your ‘My Organisations’ dialog box, which you can also access by going to ‘Account’ > ‘Organisations’. | ||
# Within the ‘My Organisations’ dialog box, clicking ‘View’ provides the organization's details, and ‘Unlink’ will remove your association with said organization.<br>[[File:My-organisations-with-new-org-added.png|500px]] | # Within the ‘My Organisations’ dialog box, clicking ‘View’ provides the organization's details, and ‘Unlink’ will remove your association with said organization.<br>[[File:My-organisations-with-new-org-added.png|500px]] | ||
| Line 43: | Line 43: | ||
# Find the call sign that needs to be removed, and click the trash can to the right of the call sign to delete the call sign. | # Find the call sign that needs to be removed, and click the trash can to the right of the call sign to delete the call sign. | ||
# To add the call sign (deleted in step 2) to an organization, follow the steps in the ‘How to Associate a Club’s Call Sign with an Organization(s)’ section above. | # To add the call sign (deleted in step 2) to an organization, follow the steps in the ‘How to Associate a Club’s Call Sign with an Organization(s)’ section above. | ||
[[Category:How-To Guides]] | |||
Latest revision as of 18:39, 11 December 2024
How Organizations Work in Portal 2.0
By Rebecca Key KO4KVG
Version 1 (September 12, 2024)
Introduction
In an effort for users to avoid having to register multiple accounts to use the Portal (as an individual and as a member of several organizations), the 44Net Portal now allows for users to associate their accounts with multiple organizations, eliminating the need to set up additional accounts.
Overview
- When a user initially registers for an account on the Portal, they are registered as an individual.
- Upon account setup, each user that registers as an amateur radio operator is associated with the organization “AMPRNet” as the default. From here, a user can either create a new organization or join existing organizations.
- Additional call signs can be added to a user’s individual account, provided that the call sign belongs to them.
- Call signs can also be added to an organization account, provided that the call sign belongs to the organization.
General Guidance on Account Setup
- If you are interested in setting up an organization on the portal and you are the only user managing the club, it is simpler to just add the club call sign to your own account.
- If there are multiple people involved with the club, then you should create an organization: this way, other club officers can manage the club’s resources on the portal, such as call sign(s), DNS entries, etc.
How to Create an Organization(s)
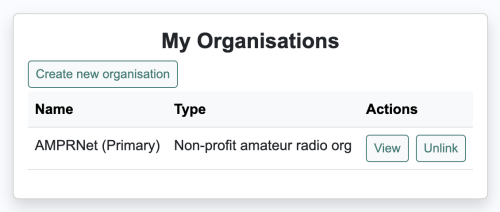
- To create an organization, go to ‘Account’ > ‘Organisations’, and you should see a ‘My Organisations’ dialog box, where ‘AMPRNet (Primary)’ is listed as the default.

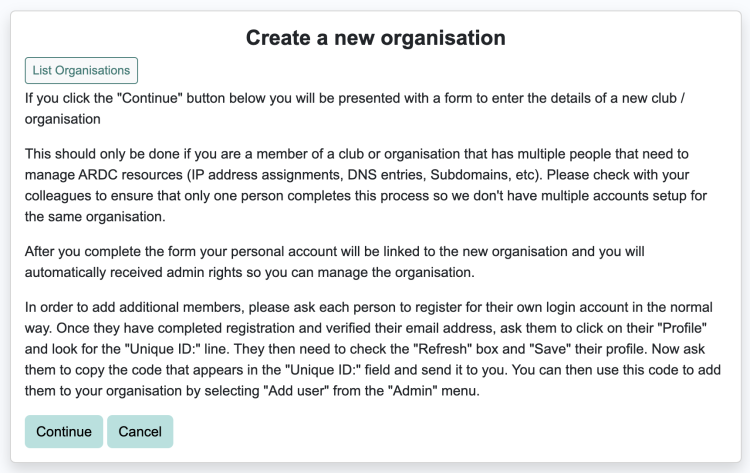
- Click ‘Create a new organization’, where you should see the ‘Create a new organization’ dialog box that provides instructions on how to set up a new organization. Click ‘Continue’ to proceed.

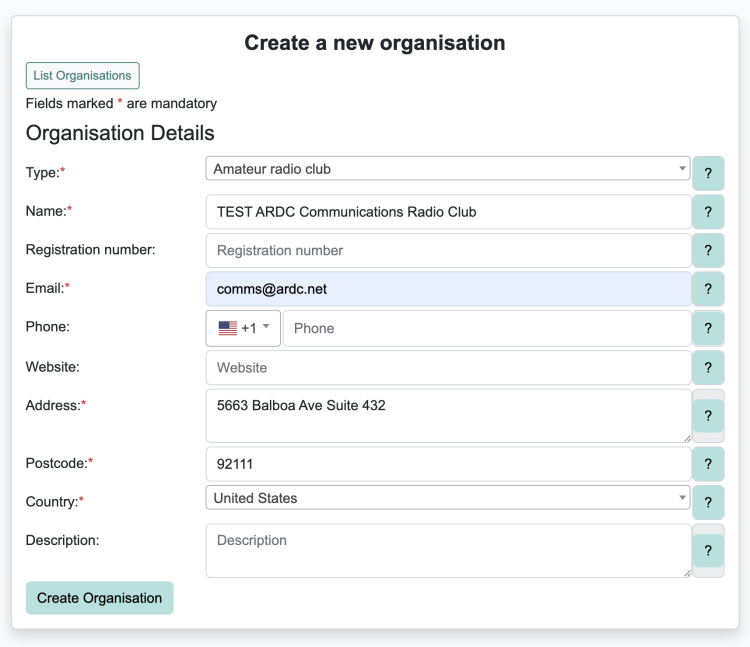
- You should now see the ‘Create a new organisation' form.

Fill out the required fields, click ‘Create Organisation’, and you will get a note saying ‘Your new organisation was created successfully.’
The new organization should also be listed in your ‘My Organisations’ dialog box, which you can also access by going to ‘Account’ > ‘Organisations’. - Within the ‘My Organisations’ dialog box, clicking ‘View’ provides the organization's details, and ‘Unlink’ will remove your association with said organization.

How to Associate a Club’s Call Sign with an Organization(s)
- Go to ‘Admin’ > ‘Call signs’, where you will see a ‘Your organisation’s call signs’ dialog box that lists all call signs associated with the organization. In some cases, the list might be blank. Click ‘Add a call sign’.

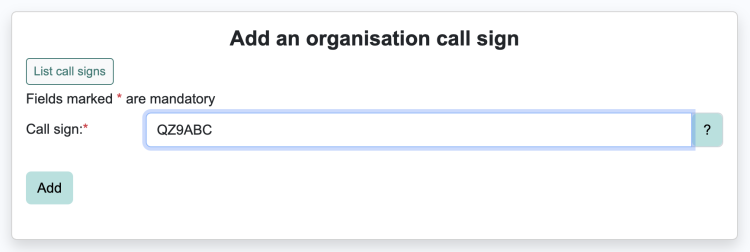
- You should then see the ‘Add an organisation call sign’ dialog box.

- Enter the call sign in the ‘Call sign’ field, click ‘Add’, and you should get a note stating ‘The new call sign was successfully added.’

- Click ‘Verify’ to open a ticket to verify the call sign of the organization.
- Repeat steps 1 - 4 to add additional call signs to an organization.
How to Associate an Individual’s Call Sign with an Organization(s)
If you have an individual account where one of the call signs tied to the account belongs to a club or organization, you will need to associate it with the related group. To do this:
- Go to ‘Account’ > ‘Call signs’, which will take you to a list of call signs associated with your account.
- Find the call sign that needs to be removed, and click the trash can to the right of the call sign to delete the call sign.
- To add the call sign (deleted in step 2) to an organization, follow the steps in the ‘How to Associate a Club’s Call Sign with an Organization(s)’ section above.