Portal Call Sign Verification: Difference between revisions
Add category tag |
|||
| (3 intermediate revisions by 2 users not shown) | |||
| Line 1: | Line 1: | ||
== Verification == | == Verification == | ||
=== How to Verify Call Signs === | === How to Verify Call Signs === | ||
| Line 50: | Line 49: | ||
<br>[[File:Detail.png|500px]] | <br>[[File:Detail.png|500px]] | ||
* On the ticket, click the name listed to the right of the ''' | * On the ticket, click the name listed to the right of the '''"Member"''' field. | ||
<br>[[File:Ticket-information-call-sign-lookup.png|500px]] | <br>[[File:Ticket-information-call-sign-lookup.png|500px]] | ||
| Line 59: | Line 58: | ||
== License Verification == | == License Verification == | ||
'''''Some license verification information is available here. For example, it will help you in identifying unfamiliar license call sign prefixes and other available information, as seen below.''''' | '''''Some license verification information is available here. For example, it will help you in identifying unfamiliar license call sign prefixes and other available information. If there isn't help information, you will receive a message as seen below.''''' | ||
* Click “'''License Verification'''” | * Click “'''License Verification'''” | ||
| Line 93: | Line 92: | ||
'''You're Done!! Grab the next Ticket''' | '''You're Done!! Grab the next Ticket''' | ||
[[Category:Portal Administration]] | |||
Latest revision as of 18:30, 11 December 2024
Verification
How to Verify Call Signs
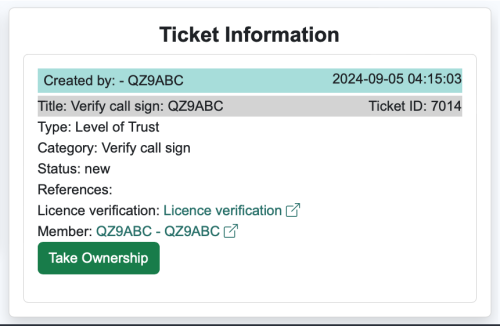
Claim the Ticket
- Click “Preview”
- Click “Take Ownership”
Verify the Request
- Call sign verification is done by comparing either against an online Government database or from an uploaded copy of their license, to the information that they have in their profile. We are mainly checking if the account has a valid call sign associated. To help with their next step of address verification, if information included on their license is missing from their profile, leave a friendly reminder and ask them to update their portal profile to include missing information from their license, most specifically their address.
- If you’re not able to verify via database - respond to the ticket and request that the user upload a copy of their license. You can use the comment: “Hello, we were unable to verify your call sign using publicly-available databases. Please upload a valid copy of your license.”
STEPS:
- Automatic Lookup. For some regions, we have a have license verification tool for call sign lookup to help with verification.
- Manually look up the call sign in a database and determine if it meets standards.
- Minimal Verification will be:
- Is it a valid call sign?
- Full Name - First and Last (given name)
- Minimal Verification will be:
- If the call sign is for an organization:
- Reply back to the applicant, ask if this is solely for their own use.
- If they apply that they are the only one, you can add this call sign with their individual account.
- If they say this call sign is used for multiple individuals, they should apply as an organization. Refer to Organizations in the Portal for more details.
- Reply back to the applicant, ask if this is solely for their own use.
Note that AMPRNet (Pri) is set as the default organization for all accounts.
- If able to verify - click approve.
- Add a comment along the lines of “Verified name, email and address in [X database].”
- Do not include any personal identifying information (PII) in this field.
Look Up Call Sign
The Portal has a call sign lookup for some locations. If the user hasn’t uploaded a license, we're going to check the call sign lookup first.
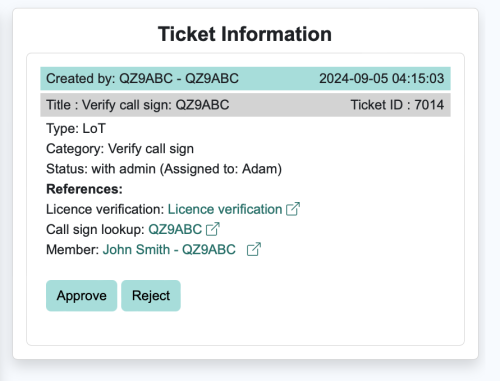
Click the users call sign as shown below (beside 'Call sign lookup').
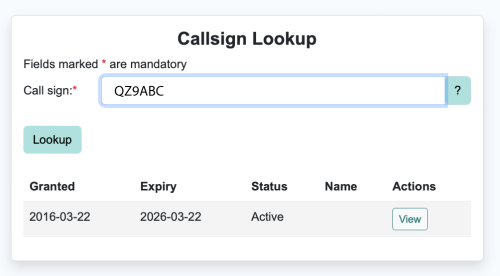
- If there is information in the lookup (see below), we can use the provided information to compare to the user's Portal profile
- Click “View” to continue. This will bring you to the call sign lookup detail described in the next section.
Compare Call Sign Information
Next, we’re going to compare information from the call sign lookup detail to information in the member's profile.
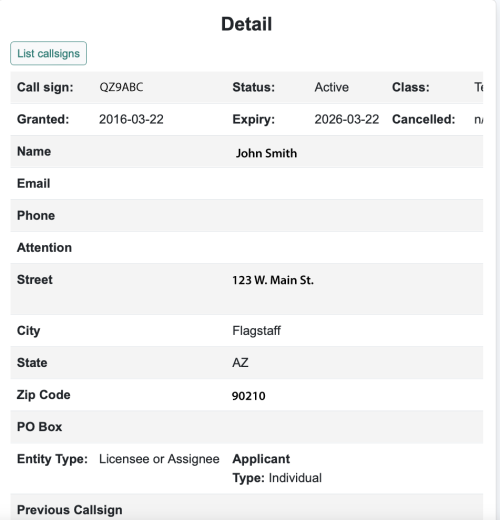
- Below is the call sign detail returned from the call sign lookup described in the section above.
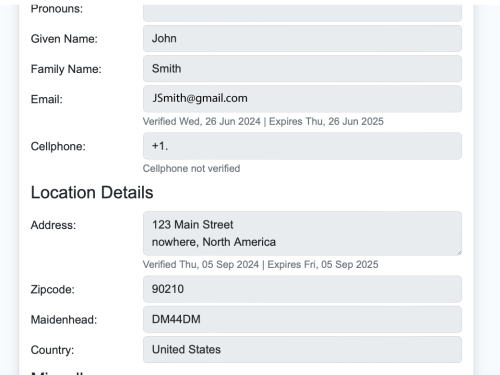
- On the ticket, click the name listed to the right of the "Member" field.
- This will bring you to the member's profile details, where the name in the profile should match the name returned from the call sign lookup.
License Verification
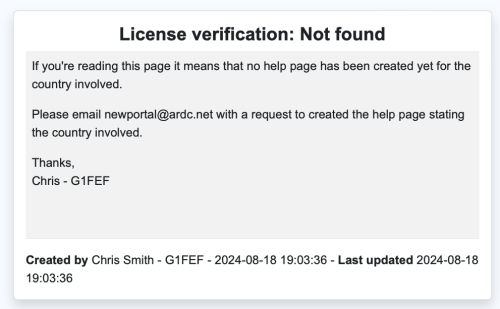
Some license verification information is available here. For example, it will help you in identifying unfamiliar license call sign prefixes and other available information. If there isn't help information, you will receive a message as seen below.
- Click “License Verification”
Approve, Reply, or Reject
- IF the user has uploaded a license to verify against, and all looks in order, add a welcoming reply, and click “Accept” to approve request
- IF any information is missing or doesn’t match, reply with a message detailing what’s missing and keep the ticket open. (Keep an eye out for future updates on ticket)
- IF information in Portal profile doesn’t match their call sign information from on line or uploaded license, send a reply requesting a reason for discrepancy. Ask them to correct if discrepancy was in error.
- IF the request is suspected to be fraudulent, provide a polite response, letting them know reason you will not approve the request, and that you will be closing the ticket. (Do not close the ticket without giving them an explanation)
In all cases, remind users that if they believe their ticket was closed in error, they should feel free to open a new ticket.
Aim for a user-friendly and easy process. Give users the benefit of the doubt and provide a clear path to fix errors. Focus on protecting against intentional fraud rather than conducting an overly strict review.
(Make sure to click “Add Reply” to upload/post your message)
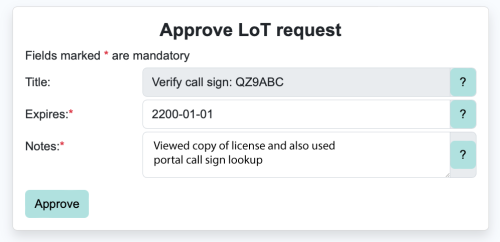
Approve Request
- Click “Approve”
- Add Notes: Provide brief summary of how you verified the call sign
- Click “Approve”
You're Done!! Grab the next Ticket
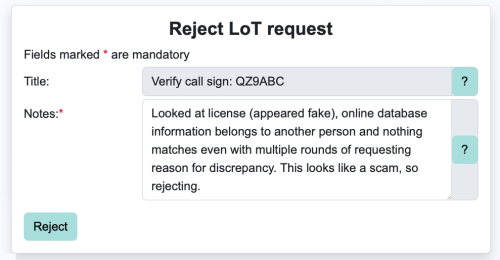
Reject Request
- Click “Reject
- Add Notes: Provide brief summary of why you rejected the verification
- Click “Confirm rejection”
You're Done!! Grab the next Ticket
