GetStarted: Difference between revisions
// via Wikitext Extension for VSCode |
Add new getting started page |
||
| Line 6: | Line 6: | ||
Begin by creating an account on the [https://portal.ampr.org AMPRNet Portal]. This is your gateway to managing your 44Net resources. | Begin by creating an account on the [https://portal.ampr.org AMPRNet Portal]. This is your gateway to managing your 44Net resources. | ||
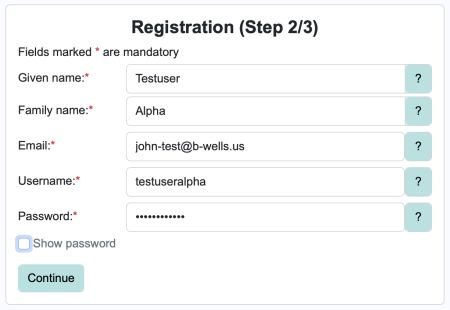
<div style="clear:both;">[[File:Registration_Step_2.png|450px|Follow the steps to fill in your basic profile information.]]</div> | |||
== Step 2: Confirm Your Email == | == Step 2: Confirm Your Email == | ||
After registering, check your email inbox for a confirmation email. Follow the instructions in the email to verify your address. This step ensures your account is active and ready to use. | After registering, check your email inbox for a confirmation email. Follow the instructions in the email to verify your address. This step ensures your account is active and ready to use. | ||
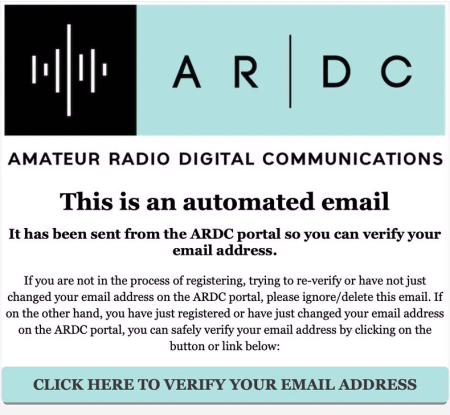
[[File:Registration_Email_Confirmation.png|450px|Check your inbox for an email prompting you to confirm your email address.]] | |||
== Step 3: Log In and | == Step 3: Log In and Complete your Profile == | ||
Once your email is confirmed, log in to the portal and | Once your email is confirmed, log in to the portal and complete your profile, including your grid square location. | ||
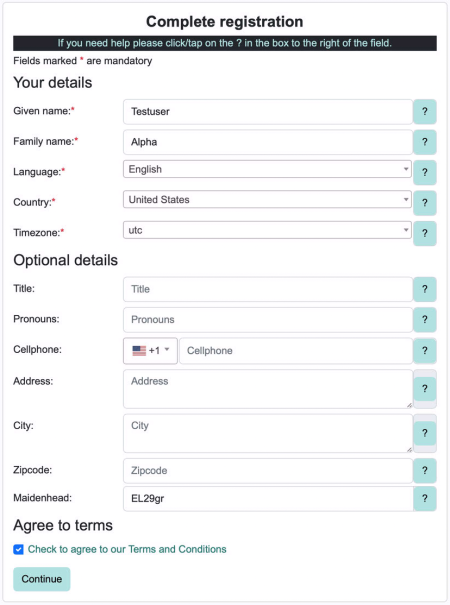
[[File:Registration_Complete_Profile.png|450px|When you confirm your email address, you will see a form for completing your profile, including your grid square location.]] | |||
== Step 4: Submit Your Callsign for Verification == | == Step 4: Submit Your Callsign for Verification == | ||
| Line 23: | Line 23: | ||
For more details, see the [[Verification]] page. | For more details, see the [[Verification]] page. | ||
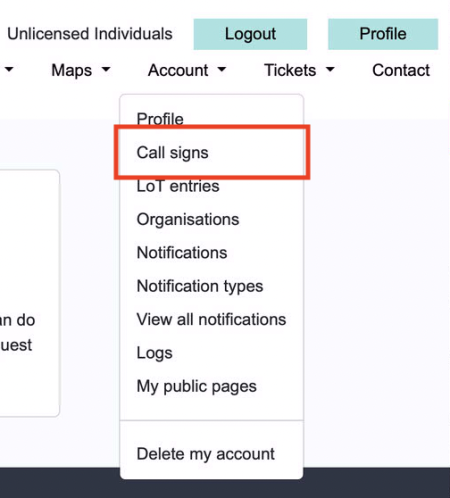
[[File:Account_Callsign_Menu.png|450px]] | |||
== | == Next Steps == | ||
* | Once your account is created and your callsign is added to your profile, you can begin to explore what's available with 44Net. | ||
* | |||
=== Request a Subnet === | |||
* With just a callsign verified, you can request a subnet ranging from /32 to /25. | |||
* With an address also verified, you can request a /24. | |||
[Portal_intro#Requesting_Address_Space_(Beginner_Friendly_Steps)] | |||
Once your subnet is approved, you're ready to configure your network. | Once your subnet is approved, you're ready to configure your network. | ||
== | === Request your DNS domain === | ||
* Configure your hardware for IPIP mesh networking | With a verified callsign, you can claim your own DNS subdomain at '''<callsign>.ampr.org''': [[Portal_intro#Adding_DNS_Records_to_a_Subdomain|Subdomains]] | ||
* Work with your ISP to announce your /24 via BGP | |||
=== Configure Your Network === | |||
* Configure your hardware for IPIP mesh networking: [[Portal_intro#Use_Case:_IPIP_Tunnel_Mesh,_Radio,_Globally_Unique_Space,_or_General_Address_Assignment|IPIP Mesh]] | |||
* Work with your ISP to announce your /24 via BGP: [[Portal_intro#Use_Case:_BGP_Direct_Announce|BGP Direct Announce]] | |||
=== Get More Help === | |||
* Check out our complete portal guide for mode details: [[Portal_intro|Portal Intro]] | |||
* Search the wiki for detailed guides and troubleshooting tips: [[Special:Search|Search the Wiki]] | |||
* Search the wiki for detailed guides and troubleshooting tips | |||
* Join the [https://groups.io/g/ardc/44net ARDC 44Net group] on Groups.io to connect with other users and ask questions. | * Join the [https://groups.io/g/ardc/44net ARDC 44Net group] on Groups.io to connect with other users and ask questions. | ||
We’re excited to have you join the 44Net community. Happy networking, and 73! | We’re excited to have you join the 44Net community. Happy networking, and 73! | ||
Revision as of 18:58, 14 May 2025
Getting Started with 44Net
Welcome to 44Net! This guide will walk you through the steps to get started.
Step 1: Create an Account
Begin by creating an account on the AMPRNet Portal. This is your gateway to managing your 44Net resources.
Step 2: Confirm Your Email
After registering, check your email inbox for a confirmation email. Follow the instructions in the email to verify your address. This step ensures your account is active and ready to use.
Step 3: Log In and Complete your Profile
Once your email is confirmed, log in to the portal and complete your profile, including your grid square location.
Step 4: Submit Your Callsign for Verification
Submit your callsign for verification. Be sure to include a copy of your amateur radio license, if available. This helps the administrators verify your identity and approve your account.
For more details, see the Verification page.
Next Steps
Once your account is created and your callsign is added to your profile, you can begin to explore what's available with 44Net.
Request a Subnet
- With just a callsign verified, you can request a subnet ranging from /32 to /25.
- With an address also verified, you can request a /24.
[Portal_intro#Requesting_Address_Space_(Beginner_Friendly_Steps)]
Once your subnet is approved, you're ready to configure your network.
Request your DNS domain
With a verified callsign, you can claim your own DNS subdomain at <callsign>.ampr.org: Subdomains
Configure Your Network
- Configure your hardware for IPIP mesh networking: IPIP Mesh
- Work with your ISP to announce your /24 via BGP: BGP Direct Announce
Get More Help
- Check out our complete portal guide for mode details: Portal Intro
- Search the wiki for detailed guides and troubleshooting tips: Search the Wiki
- Join the ARDC 44Net group on Groups.io to connect with other users and ask questions.
We’re excited to have you join the 44Net community. Happy networking, and 73!


